Banyak yang menyediakan VPN gratis di internet, salah satunya browsec extension yang bisa kita install pada browser chrome.
Tapi sebenarnya kalau kita punya server VPS, kita bisa buat sendiri VPNnya. Jadi kita tinggal install VPNnya di server VPS. Dengan memanfaatkan koneksi network/jaringan yang ada di VPS untuk bisa connect ke website yang dibl0ck oleh ISP.
Cara kerja VPN di VPS
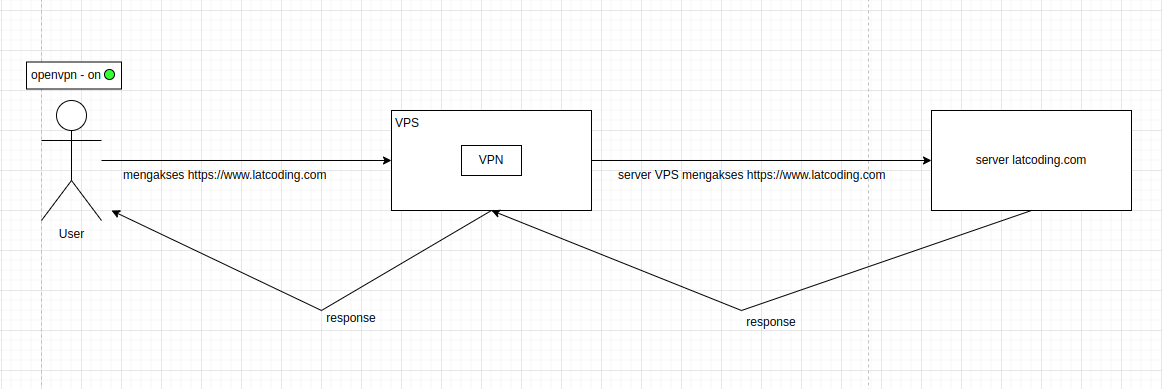
Sesuai gambar diatas, misal kita ingin mengakses suatu website menggunakan VPN, koneksinya akan diarahkan ke server VPS dulu (yang didalamnya terdapat VPN), setelah itu koneksinya diteruskan menggunakan jaringan VPS untuk mengakses website yang dituju. Kemudian jika sudah dapat response dari website tersebut, responsenya akan dikembalikan ke server VPS dan diteruskan ke user. Dan finally, user bisa melihat halaman websitenya.
Jadi jika menggunakan VPN, koneksi dari ISP akan diarahkan ke server VPS dulu, baru disambungkan ke website tujuan.
Jika tidak menggunakan VPN, dari ISP langsung connect ke website tujuan. Jika websitenya masuk ke dalam daftar website yang dibl0ck oleh ISP, maka kita tidak bisa mengaksesnya. Maka dari itu kita memerlukan VPN.
Cara Setup VPN di server VPS
Environment yang saya gunakan adalah:
- OS Ubuntu 22.04
- Server VPS di EC2 AWS
Dan sudah ditest juga OS lain: Amazon Linux 2 AMI, dan works.
Cara setup VPN di server VPS, yaitu:
- install openvpn di server & buat user openvpn (akan tergenerate file berektensi .ovpn)
- pastikan port openvpn (UDP 1194) sudah dibuka pada firewall / inbound rule
- jalankan file .ovpn di lokal komputer menggunakan software
openvpn clientjika menggunakan windows, jika menggunakan ubuntu bisa langsung browse file .ovpnnya - Test koneksi VPN
– Install Openvpn di server & Buat User Openvpn
Disini saya menggunakan server VPS: EC2 AWS yang dihosting di region singapore. Artinya nanti kita akan connect VPN menggunakan IP singapore. Berikut detail speknya:

Instance type: t2.micro (vCPU 1, RAM 1GB)
IP Public: 3.1.116.195 (Singapore)
Kita akan menginstall openvpn menggunakan angristan/openvpn-install. Masuk ke terminal, pertama kita download dulu script installer openvpnnya:
sudo su
apt-get update
curl -O https://raw.githubusercontent.com/angristan/openvpn-install/master/openvpn-install.sh
chmod +x openvpn-install.sh
Kemudian kita install openvpnnya:
./openvpn-install.shSetelah itu cukup enter-enter saja, kita akan menggunakan konfigurasi default saja:
Welcome to the OpenVPN installer!
The git repository is available at: https://github.com/angristan/openvpn-install
I need to ask you a few questions before starting the setup.
You can leave the default options and just press enter if you are ok with them.
I need to know the IPv4 address of the network interface you want OpenVPN listening to.
Unless your server is behind NAT, it should be your public IPv4 address.
IP address: 172.31.24.125
It seems this server is behind NAT. What is its public IPv4 address or hostname?
We need it for the clients to connect to the server.
Public IPv4 address or hostname: 3.1.116.195
Checking for IPv6 connectivity...
Your host does not appear to have IPv6 connectivity.
Do you want to enable IPv6 support (NAT)? [y/n]: n
What port do you want OpenVPN to listen to?
1) Default: 1194
2) Custom
3) Random [49152-65535]
Port choice [1-3]: 1
What protocol do you want OpenVPN to use?
UDP is faster. Unless it is not available, you shouldn't use TCP.
1) UDP
2) TCP
Protocol [1-2]: 1
What DNS resolvers do you want to use with the VPN?
1) Current system resolvers (from /etc/resolv.conf)
2) Self-hosted DNS Resolver (Unbound)
3) Cloudflare (Anycast: worldwide)
4) Quad9 (Anycast: worldwide)
5) Quad9 uncensored (Anycast: worldwide)
6) FDN (France)
7) DNS.WATCH (Germany)
8) OpenDNS (Anycast: worldwide)
9) Google (Anycast: worldwide)
10) Yandex Basic (Russia)
11) AdGuard DNS (Anycast: worldwide)
12) NextDNS (Anycast: worldwide)
13) Custom
DNS [1-12]: 11
Do you want to use compression? It is not recommended since the VORACLE attack makes use of it.
Enable compression? [y/n]: n
Do you want to customize encryption settings?
Unless you know what you're doing, you should stick with the default parameters provided by the script.
Note that whatever you choose, all the choices presented in the script are safe. (Unlike OpenVPN's defaults)
See https://github.com/angristan/openvpn-install#security-and-encryption to learn more.
Customize encryption settings? [y/n]: n
Okay, that was all I needed. We are ready to setup your OpenVPN server now.
You will be able to generate a client at the end of the installation.
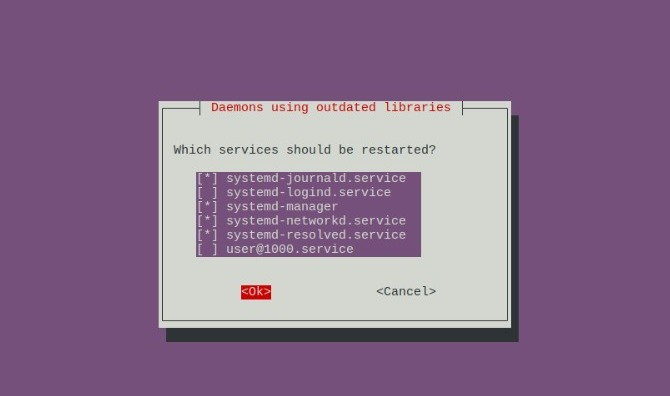
Press any key to continue...Setelah itu akan mendownload openvpn sesuai konfigurasi yang sudah kita buat, tunggu beberapa saat sampai muncul service mana yang mau direstart, cukup tekan tab dan enter:
Kemudian akan lanjut mendownload & mengkonfigurasi Certificate, tunggu beberapa saat lagi sampai ditanya Client Name. Client name merupakan user openvpn. Isi client name dengan nama bebas, misal saya isi ‘user-openvpn’:
Tell me a name for the client.
The name must consist of alphanumeric character. It may also include an underscore or a dash.
Client name: user-openvpn

Do you want to protect the configuration file with a password?
(e.g. encrypt the private key with a password)
   1) Add a passwordless client
   2) Use a password for the client
Select an option [1-2]: 1

* Using SSL: openssl OpenSSL 3.0.2 15 Mar 2022 (Library: OpenSSL 3.0.2 15 Mar 2022)

* Using Easy-RSA configuration: /etc/openvpn/easy-rsa/vars

* The preferred location for 'vars' is within the PKI folder.
  To silence this message move your 'vars' file to your PKI
  or declare your 'vars' file with option: --vars=<FILE>
-----

Notice
------
Keypair and certificate request completed. Your files are:
req: /etc/openvpn/easy-rsa/pki/reqs/user-openvpn.req
key: /etc/openvpn/easy-rsa/pki/private/user-openvpn.key
Using configuration from /etc/openvpn/easy-rsa/pki/41ad1633/temp.bba11603
Check that the request matches the signature
Signature ok
The Subject's Distinguished Name is as follows
commonName            :ASN.1 12:'user-openvpn'
Certificate is to be certified until Nov 14 07:00:39 2025 GMT (825 days)

Write out database with 1 new entries
Data Base Updated

Notice
------
Certificate created at:
* /etc/openvpn/easy-rsa/pki/issued/user-openvpn.crt

Notice
------
Inline file created:
* /etc/openvpn/easy-rsa/pki/inline/user-openvpn.inline
Client user-openvpn added.

The configuration file has been written to /home/ubuntu/user-openvpn.ovpn.
Download the .ovpn file and import it in your OpenVPN client.
File .ovpn disimpan di path /home/ubuntu/user-openvpn.ovpn. Copykan file tersebut ke lokal computer. Nantinya kita akan connect ke VPN menggunakan file user-openvpn.ovpn ini.
– Pastikan port openvpn (UDP 1194) sudah dibuka pada firewall / inbound rule
Sebelumnya kita menginstall openvpn dengan port default (UDP 1194). Maka pada firewall / inbound rule harus kita allow juga port tersebut.

– Jalankan .ovpn di lokal komputer
Selanjutnya kita tinggal test koneksi VPNnya menggunakan file user-openvpn.ovpn yang sudah kita download tadi.
#Windows
Jika diwindows kita memerlukan software tambahan yaitu openvpn client, silahkan download dan install dulu softwarenya https://openvpn.net/client/client-connect-vpn-for-windows/
Setelah terinstall, import file -> browse -> pilih file user-openvpn.ovpn dan klik Connect.
Jika tampilannya seperti gambar dibawah, maka VPN berhasil terconnect.
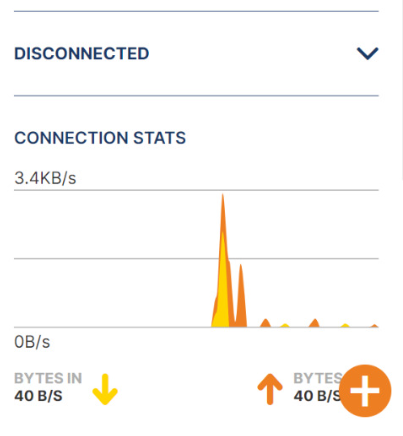
#Ubuntu
Jika di Ubuntu, Masuk ke Settings -> Network -> VPN -> klik icon plus -> Import From File -> pilih file user-openvpn.ovpn -> klik add -> lalu ON kan koneksinya

Test Koneksi VPN
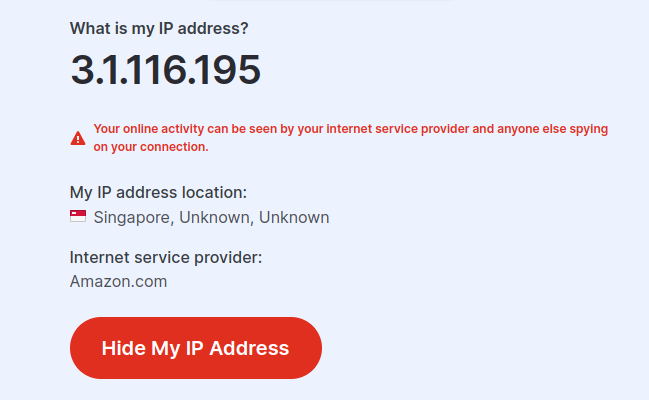
Sekarang kita tinggal cek apakah sekarang sudah menggunakan IP Public si VPS (singapore).
Kita bisa mengeceknya di https://www.iplocation.net/, jika tampilannya seperti dibawah berarti VPN berfungsi dengan baik. IP yang digunakan sudah IP Public VPS. Good.
Tambah dan Hapus User Openvpn
Untuk menambahkan user openvpn, jalankan kembali file .sh nya, dan pilih nomor 1..
Untuk menghapus user, pilih nomor 3.
./openvpn-install.sh
Welcome to OpenVPN-install!
The git repository is available at: https://github.com/angristan/openvpn-install

It looks like OpenVPN is already installed.

What do you want to do?
   1) Add a new user
   2) Revoke existing user
   3) Remove OpenVPN
   4) Exit